This is the second post of the multi-part blog series on setting up and running UCSF Chimera.
The previous article featured a general overview, installation, and several visual examples of UCSF Chimera. Detailed instructions for installation on Windows 10 and Linux Mint were also provided.
In this part, we will go through setup, customization of Tools and layout, and the first run of the Chimera application. We will also get into the writing and using scripts and keyboard shortcuts.
Customize the Chimera Launch
Before running Chimera, I recommend a minor customization of options and paths such that it will launch with some features and attributes already enabled and set.
- right-mouse click on the Chimera's Desktop icon and select
Properties(at the bottom) - append
--bgopacityoption to theTargetfield and ~/Desktop path to theStart in:field (see Figure 1) - click OK
What the above steps accomplished is that, first, any exported image (tiff or png) will have a transparent background (this is optional and can be changed later during image export). Second, the Chimera will now be looking for any custom (Python) script files (e.g., style.py) at your Desktop. An example of such a script file is below.
Fig. 1. Customization of Chimera's launch options under "icon" Properties.
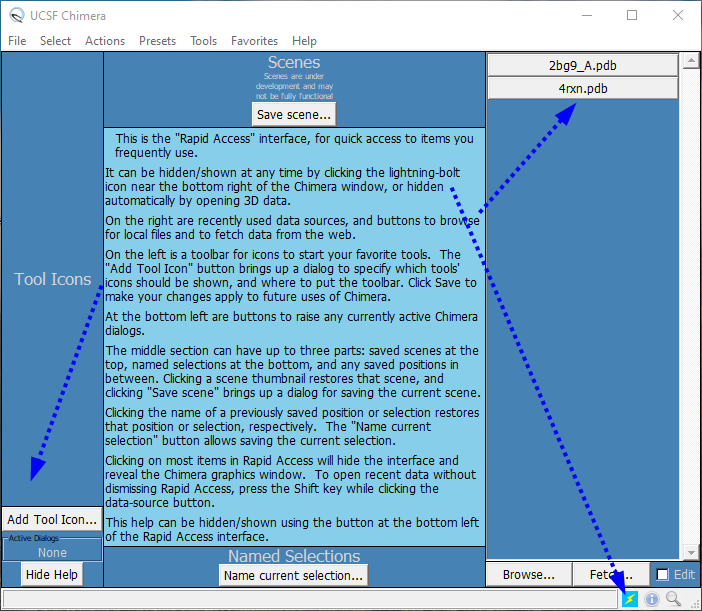
Now, when you double-click the Chimera icon on the Desktop (or type >chimera in your terminal), the application will launch and present a window shown in Figure 2. If you do not see such a layout, click the "lightning-bolt" toggle icon in the bottom-right section. ![]()

Fig. 2. Chimera's GUI layout after the first launch.
Go to File → Close Session to have the workspace back in the initial state.
Let's continue with basic and custom settings that will persist for all Chimera sessions.
Chimera settings
Chimera is highly customizable, and having a toolbar of "preset" icons, buttons, and tools becomes a great convenience. Most settings are activated from the menu item Favorites → Preferences located at the top of the GUI (Fig. 2). Below are the settings that I found useful in my work. Different settings panels are available from the pull-down menu next to Category:
- Category: General → Initial window size: remember last
- Category: PDB - add the path to the folder of your .pdb files (optional)
- Category: Tools - I recommend starting with selections, as shown in Fig. 3. Also, in the
On Toolbarcolumn, I checked2D Labels,PseudoBond Reader,FindHBond,Find Clashes/Contacts,Distances,ViewDock, Dock Prep, AutoDock Vina,AddH,Reply Log

Fig. 3. The main area for setting Chimera's Tools.
At this point, you should see new buttons (icons) in the toolbar. I keep it positioned on the left, although Figure 4. shows it horizontal.

Fig. 4. Customized toolbar with shortcut buttons.
To change the order of buttons in the Toolbar, go to ~/.chimera folder (Win10: C:\Users\USERNAME\AppData\Roaming\.chimera, Linux: $HOME/.chimera), open the preferences file, and manually edit the (order) numbers next to each Tool in the onToolbar section.
Plugins
At the bottom of the Preferences window, there is an area for entering path to Chimera plugins (Fig. 3). Plugins can be downloaded from various sites and are typically free to use. My favorite plugins are:
- Probis Plugin - Allows prediction of binding sites and their corresponding ligands for a given protein structure. Conceptually, it is similar to
SiteMapin the Maestro module from Schrödinger. - Chimera-BILD - An extension allowing to draw arrows, spheres, boxes, etc. with customizable colors and transparency. The plugin was build by José Emilio Sánchez Aparicio and is available at the GitHub.
A typical way of installing a plugin is to download it from the author's website (or GitHub). Download the .zip file and place it to a directory where you keep your Chimera plugins (in my case, F:\Computation\chimera). Unzip the downloaded file (use 'extract here'). The folder structure is shown in Figure 5. Then in Favorites → Preferences: Tools, click Add and browse to the plugin directory, select the top-level plugin folder ('bild_shapes' in Fig. 3) and click Open.

Fig. 5. A typical hierarchy of plugin files.
Close and restart Chimera and make sure that the new Toolbar with buttons and Command line are visible and that Plugins are loaded.
Advanced custom options - midasrc and style.py script
I prefer including more advanced topics right into the basic description, because once you start mastering the subject, you can still review the basic material all in one place.
For the Chimera initial settings, we will make use of two files that store custom presets and actions. The first one is midasrc, which has to be created first. On Windows, head to C:/Users/USERNAME and create a new folder .chimera. On the Linux system, head to $HOME/.chimera folder. Now, on either OS and in the folder .chimera, create a new text document. Save the empty document as midarsrc. Copy/paste the text below and save the file again.
# midasrc in ~./chimera

# Accelerators - enable keybord shortcuts as per
# https://www.cgl.ucsf.edu/chimera/current/docs/ContributedSoftware/accelerators/alist.html
ac
# Define an alias and then call it from Command line as >style
alias style run C:/Users/Public/Desktop/style.py   # on Windows
# alias style ~/Desktop/style.py  # on Linux
Upon launching the Chimera, the file will be read first and options applied to our project.
A handy feature of Chimera, that is the keyboard shortcuts (accelerators), has now been activated. The full list is maintained here.
To use those shortcuts, have a protein or model loaded in the main space, place the mouse cursor in the same area, and type the command on your keyboard as a sequence of two keystrokes. My favorite commands are:
c2(color by secondary structure)hsorsf(hide or show surface)wb(white background) andbkto get back to black backgroundwr(wire representation),bs(ball and stick representation) - works also for selections
To further standardize and customize the initial visualization of proteins and molecules, I use the style.py script. This Python script is on my Desktop - C:\Users\Public\Desktop (notice the option Start in: in Fig. 1) and can be called from Chimera's Command line AFTER the protein/model is loaded like so:
>style
or
>run style.py
Copy the script below and paste it into a new text document. Save it to your ~\Public\Desktop folder as style.py. Your midasrc alias is already set to point to it. As your tasks evolve, add more commands to the script.
import os
from chimera import runCommand as rc # Use 'rc' as shorthand for runCommand
from chimera import replyobj # For emitting status messages

# run as >read style.py or >style  (if alias exists)

# Labels
rc("labelopt resinfo %(1-letter code)s%(number)s")
rc("color hot pink,lr")
#Set visualization
rc("preset apply interactive 1") # change later by keyboard c2
rc("~longbond") # remove dotted connectors of disconnected chains
# Background
#rc("set bg_color white")
# Orientation
rc("focus")
# Rendering of ligands
rc("represent wire")
rc("color byelement")
rc("setattr m stickScale 0.62")
rc("setattr m ballScale 0.15")
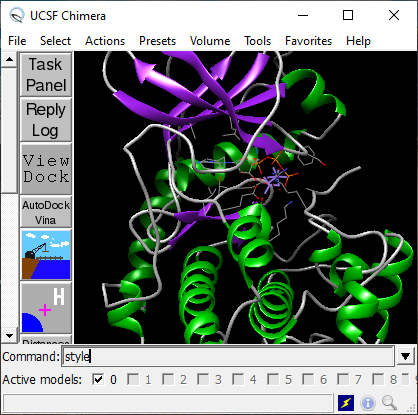
Re-run the PKA kinase as above and type style to the Command line and press enter. Then type the key c , release, and press 2 while pointing to the main window. Visualization should change and be similar to Figure 5.

Fig. 5. Rendering of protein kinase A (1ATP.pdb) after loading the file and applying style and c2 commands.
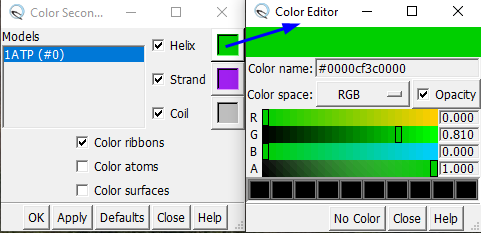
If the colors of \(\beta\)-strands and \(\alpha\)-helices look different from Figure 5, customize your preferred colors. Head to Tools → Depiction → Color Secondary Structure. You should now see the panel shown on the left in Figure 6. Double-click each color square, and a new dialog will open (Color Editor). My preferences are:
Helix, green (0, 0.81, 0, 1) (RGBA)
Strand, magenta (0.627, 0.125, 0.941, 1)
Coil, gray (0.745, 0.745, 0.745, 1)

Fig. 6. Setting the color preferences for secondary structures.
Next
After having typical settings, simple scripts, and custom presets in place, the next blog article will focus on practical examples of using Menu options and commands.
Comments
comments powered by Disqus