Introduction
With so many blogs and descriptive how-to's out there 1
,
2
,
3
,
4
,
5
,
6,
7
, one may be wondering why another post on Pelican static site generator. The purpose of this blog is to provide an entry level document for building a static web site in Windows environment with Miniconda Python distribution.
This tutorial assumes very little, so we will cover each step in a little more details. Chances are that you have already heard about the the Python-powered micro web frameworks, static page generators, and even about Pelican, Nikola, or Flask. If not, this blog8 has a nice introduction.
Requirements
Before we get started, we’ll need a base installation of Python, and of course, the Pelican. The following are the minimum requirements:
- Python 3.5 or higher (aka Python 3), but Python 2.7 (aka Python 2) works also
- Pelican package (v4 +)
- Text editor (e.g., Notepad++, Markdown Pad2, Sublime Text, or Typora)
- Web server for the web hosting
Python
First, we need a Python installation. I recommend Anaconda or Miniconda, both being a distribution of Python from the company Anaconda. Anaconda and Miniconda are free and the former comes with many pre-installed Python packages and libraries such as Pandas, NumPy, matplotlib, and others. The latter, is a minimal installer for conda. It is a small, bootstrap version of Anaconda that includes only conda, Python, the packages they depend on, and a small number of other useful packages, including pip, zlib and a few others. However, neither installation includes Pelican site generator.
If you already have Python installed, skip to the section Virtual Environment.
To get Anaconda/Miniconda installed under the Windows, download the latest binary package [ Anaconda | Miniconda ] and install the executable.
This tutorial is using Miniconda although steps with Anaconda are the same. The typical (and default) path to install Miniconda on Windows is: C:\Miniconda3.
When installation completes, append the following string into your system PATH or make sure that it is written there by the installer:
C:\Miniconda3;C:\Miniconda3\Lib;C:\Miniconda3\DLLs;C:\Miniconda3\Lib\lib-tk;C:\Miniconda3\Scripts;
To check that Miniconda has installed successfully, launch the Windows command shell (cmd.exe) and execute the command:
conda info --all
A typical (shortened) output follows:
Current miniconda install:

             platform : win-64
       python version : 3.6.7.final.0
     user config file : $HOME.condarc
Set up a virtual environment
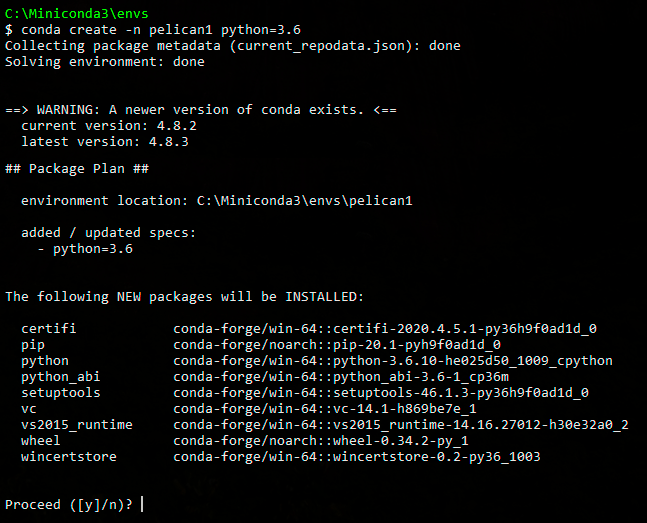
To avoid potential Python library/package dependency conflicts, it is a good practice to install new projects into their own development environment. Such environment includes a fresh copy of the Python binary together with a copy of the entire Python standard library. Most importantly, if any file gets corrupted, one can simple remove and re-install the environment. Let's create a virtual environment called pelican1.
conda create -n pelican1 python=3.6
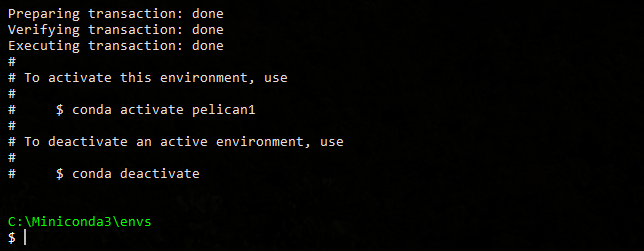
The expected response is shown in Figure 1 and Figure 2.

Fig. 1. Creating virtual environment pelican1.

Fig. 2. Packages installed in the virt env pelican1.
Anywhere on your computer, make a new folder for your blog items (e.g., blog) and activate the new environment as:
> cd path\to\blog
> conda activate pelican1
if everything went as expected, you should see the following text at the command prompt:
(pelican1) drive:\\path\to\blog
Pelican
Finally, we proceed with the installation of the Pelican package. In your terminal, execute:
(pelican1) drive:\\path\to\blog >conda install pelican
The progress will look similar to the following output.
 Downloading pelican-3.6.2-py2.py3-none-any.whl (129kB)
 Downloading Pygments-2.0.2-py2-none-any.whl (672kB)
 Downloading feedgenerator-1.7.tar.gz
 Downloading Unidecode-0.04.18.tar.gz (206kB)
 Downloading pytz-2015.4-py2.py3-none-any.whl (475kB)
 Downloading python_dateutil-2.4.2-py2.py3-none-any.whl (188kB)
 Downloading six-1.9.0-py2.py3-none-any.whl
 Downloading Jinja2-2.8-py2.py3-none-any.whl (263kB)
 Downloading docutils-0.12.tar.gz (1.6MB)
 Downloading blinker-1.4.tar.gz (111kB)
 Downloading MarkupSafe-0.23.tar.gz
Installing collected packages: pygments, pytz, six, feedgenerator, unidecode, py
thon-dateutil, markupsafe, jinja2, docutils, blinker, pelican
Other Python package
Following are packages that I found useful when developing and publishing Pelican blog site using Jupyter notebooks. To make their installation easier, we will use the packages.yml file.
Open a text editor and type (copy/paste) the following content.
name: pelican1
channels:
  - conda-forge
  - defaults
dependencies:
  - bs4
  - html5lib
  - Markdown
  - fabric3
  - typogrify
  - invoke
  - MarkupSafe
  - livereload
  - pybtex
  - jupyter
prefix: C:\Miniconda3\envs\pelican1
Save the file as packages.yml into the folder C:\Miniconda3\envs.
Next, from the shell, issue the following command:
(pelican1) c:\Miniconda3\envs > conda env update --file packages.yml
In case that you plan on using Disqus platform for comments and discussion on your articles, install the following package directly from the GitHub:
pip install git+https://github.com/disqus/disqus-python.git
and add "disqus_static" entry into the PLUGINS list in pelicanconf.py. To build, publish, and maintain the site, I use the Fabric Python library.
At this point, the size of pelican1 environment is about 100Mb.
Pelican blog
So far, all packages were installed in the C:\Miniconda3\env\pelican1\ folder. The actual blog files require different drive/folder location from which the site is managed. Let's create such directory, for example, F:\Blog\pelican.
Now, while still in the pelican1 virtual environment, cd into this directory:
(pelican1) c:\Miniconda3\envs\pelican1 >cd F:\Blog\pelican
To initiate this new blog/web site, run the quickstart script and answer the setup questions. Note that I have chosen not to use GitHub Pages and secure SSH protocol for upload. The latter will be addressed below.
(pelican1) F:\Blog\pelican> pelican-quickstart
> Where do you want to create your new web site? [.]  (just press enter; it will be in the /pelicalblog directory; in this case F:\Blog\pelican)
> What will be the title of this web site? Blogging with Pelican
> Who will be the author of this web site? your name
> What will be the default language of this web site? [en]
> Do you want to specify a URL prefix? e.g., http://example.com   (Y/n) y
> What is your URL prefix? (see above example; no trailing slash) http://www.yourdomain.com/blog
> Do you want to enable article pagination? (Y/n) y
> How many articles per page do you want? [10] 8
> What is your time zone? [Europe/Paris] America/Phoenix
> Do you want to generate a Fabfile/Makefile to automate generation and publishing? (Y/n) y (create fabfile.py)
> Do you want an auto-reload & simpleHTTP script to assist with theme and site development? (Y/n) y
> Do you want to upload your website using FTP? (y/N) y
> What is the hostname of your FTP server? [localhost] ftp.yourdomain.com
> What is your username on that server? [anonymous] username
> Where do you want to put your web site on that server? [/] /blog
> Do you want to upload your website using SSH? (y/N) n
> Do you want to upload your website using Dropbox? (y/N) n
> Do you want to upload your website using S3? (y/N) n
> Do you want to upload your website using Rackspace Cloud Files? (y/N) n
> Do you want to upload your website using GitHub Pages? (y/N) n
A little more explanation on the "URL prefix" question. Answer yes and enter URL in the next step only if you have external web hosting site.
Let’s take a look at the just created folder structure within the F:\Blog\pelican directory. Now if you type the tree command within your blog's main directory, you should see a directory tree similar to this one:
pelican/
├── content
│    └── firstblog.md
├── output
│    ├── author/
│    ├── category/
│    ├── tag/
│    ├── theme/
│    ├── archives.html
│    ├── authors.html
│    ├── Blogging with Pelican.html
│    ├── categories.html
│    ├── index.html
│    └── tags.html
├── fabfile.py
├── pelicanconf.py
└── publishconf.py
Breaking down each of these files:
- content/firstblog.md: A content file in Markdown syntax. This is where you start writing your blog.
- output/: Content of this folder is automatically generated and later uploaded to a server.
- fabfile.py: Is a configuration file for
Fabric, which allows you to generate your site using the fab command. - pelicanconf.py: Is a Pelican configuration file containing the site settings.
- publishconf.py: Similar to pelicanconfig.py file, but is not intended to be used for local development.
Building the site
Now let's build the default look of the blog. In your terminal, type the fab command after the > character:
(pelican1) F:\Blog\pelican>fab build
Then
(pelican1) F:\Blog\pelican>fab serve
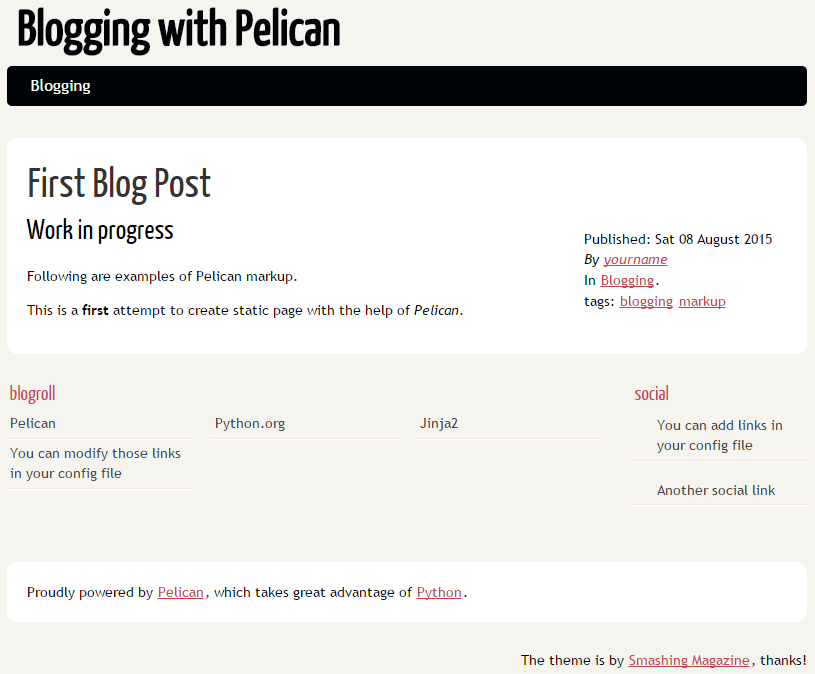
We've just launched a local webserver on the port 8000. Open your browser and navigate to http://localhost:8000 the default skeleton and template should display in your browser.

Fig. 3. Final view of the site.
To avoid repetitive typing in the terminal, set up a batch file, which will get you directly to the (pelican1) F:\Blog\pelican environment and directory.
Save the following script as pelican.batand place the file into C:\Windows\System32 directory.
@echo off
REM add this batch file into C:/windows/system32
REM run upon opening cmd as >pelican.bat
REM 'path\to\blog' example F:\Blog\pelican
set SERVE=path\to\blog
cd /D %SERVE%
conda activate pelican1
Next time, upon launching the command line terminal (cmd.exe), just type pelican.bat and the script will execute.
To change or tweak the site settings, edit files pelicanconf.py and fabfile.py created in the main path\to\blog directory.
#  pelicanconf.py
from __future__ import unicode_literals

AUTHOR = u'yourname'  #  Change it here
SITENAME = u'Blogging with Pelican'  #  Change it here
SITEURL = ''

PATH = 'output'  # This is where you write blogs, keep images, css, ..

TIMEZONE = 'America/Phoenix'  #  Change it here

DEFAULT_LANG = u'en'

# other functions (default)
#  fabfile.py
# default variables and functions follow
# ...

# Added site upload function to circumvent setup of rsync on Windows
env.hosts = ['ftp.yourdomain.com']
env.user   = "username"
env.password = "serverpassword" # or just entered it when connecting

from fabric.context_managers import cd

def sftp():
    # run from the parent directory /pelicanblog/
    with lcd('output'):  # cd into output directory
        local("dir") # list files and directories to be uploaded
        put('*', './public_html/yourblogdirectory/')  # change here
Note the sftp() function added at the end of the fabfile.py. The default publish() function is based on rsync utility that is not that easy to install on Windows. Instead, we can use the SSH File Transfer Protocol (sftp) protocol, which is also secure an simple to implement.
Markdown .md file
To create the content of our new web site, we will use the Markdown syntax9,10. Let's create our first markdown file name it firstblog.md. Save it into the /pelican/content folder.
Title: First Blog Post
Date: 2020-4-5 13:10
Category: Blogging
Tags: blogging, markup
Slug: blogging-with-pelican
Author: yourname
Summary: Collection of notes related to programming and scripting.
Latex:

# Work in progress
Following are examples of Pelican markup.

This is a **first** attempt to create static page with the help of _Pelican_.
Rendering and uploading the site
At this point, we will move back to the terminal and issue the following commands.
(pelican1) F:\Blog\pelican>fab build
(pelican1) F:\Blog\pelican>fab serve
Now, in the browser type http://localhost:8000 and our modified (local) site should load.
To upload it to a web-server, make sure that you create your blog directory at the remote site first. Note the path to it, e.g. /public_html/yourblogdirectory. Enter your host name (e.g., https://my.site.com) and user name into the fabfile.py file as shown above. In your terminal, enter:
(pelican1) F:\Blog\pelican>fab sftp
Upload process should start immediately with a list of files to be uploaded and a prompt for your password. After the upload is done, head to the site and check its accessibility (e.g., https://my.site.com/yourblogdirectory/index.html).
What's been accomplished
This concludes the process of setting up a simple Pelican site on Windows and Python miniconda environment. We have built the skeleton of Pelican static web-site in Python virtual environment, modified its configuration files, and uploaded the site to our hosting server.
References:
- Setting up Pelican ↩
- How I built this site ↩
- Blog migrated to Pelican and GitHub pages ↩
- Making a Static Blog with Pelican ↩
- Using pelican to generate static sites on windows ↩
- Creating your blog with Pelican ↩
- How to Create Your First Static Site with Pelican and Jinja2 ↩
- Creating a Blog on GitHub.io with Python ↩
- Markdown Cheatsheet ↩
- from Darin Fireball ↩
Comments
comments powered by Disqus